Showing posts with label too too hot. Show all posts

Friday, February 28, 2014

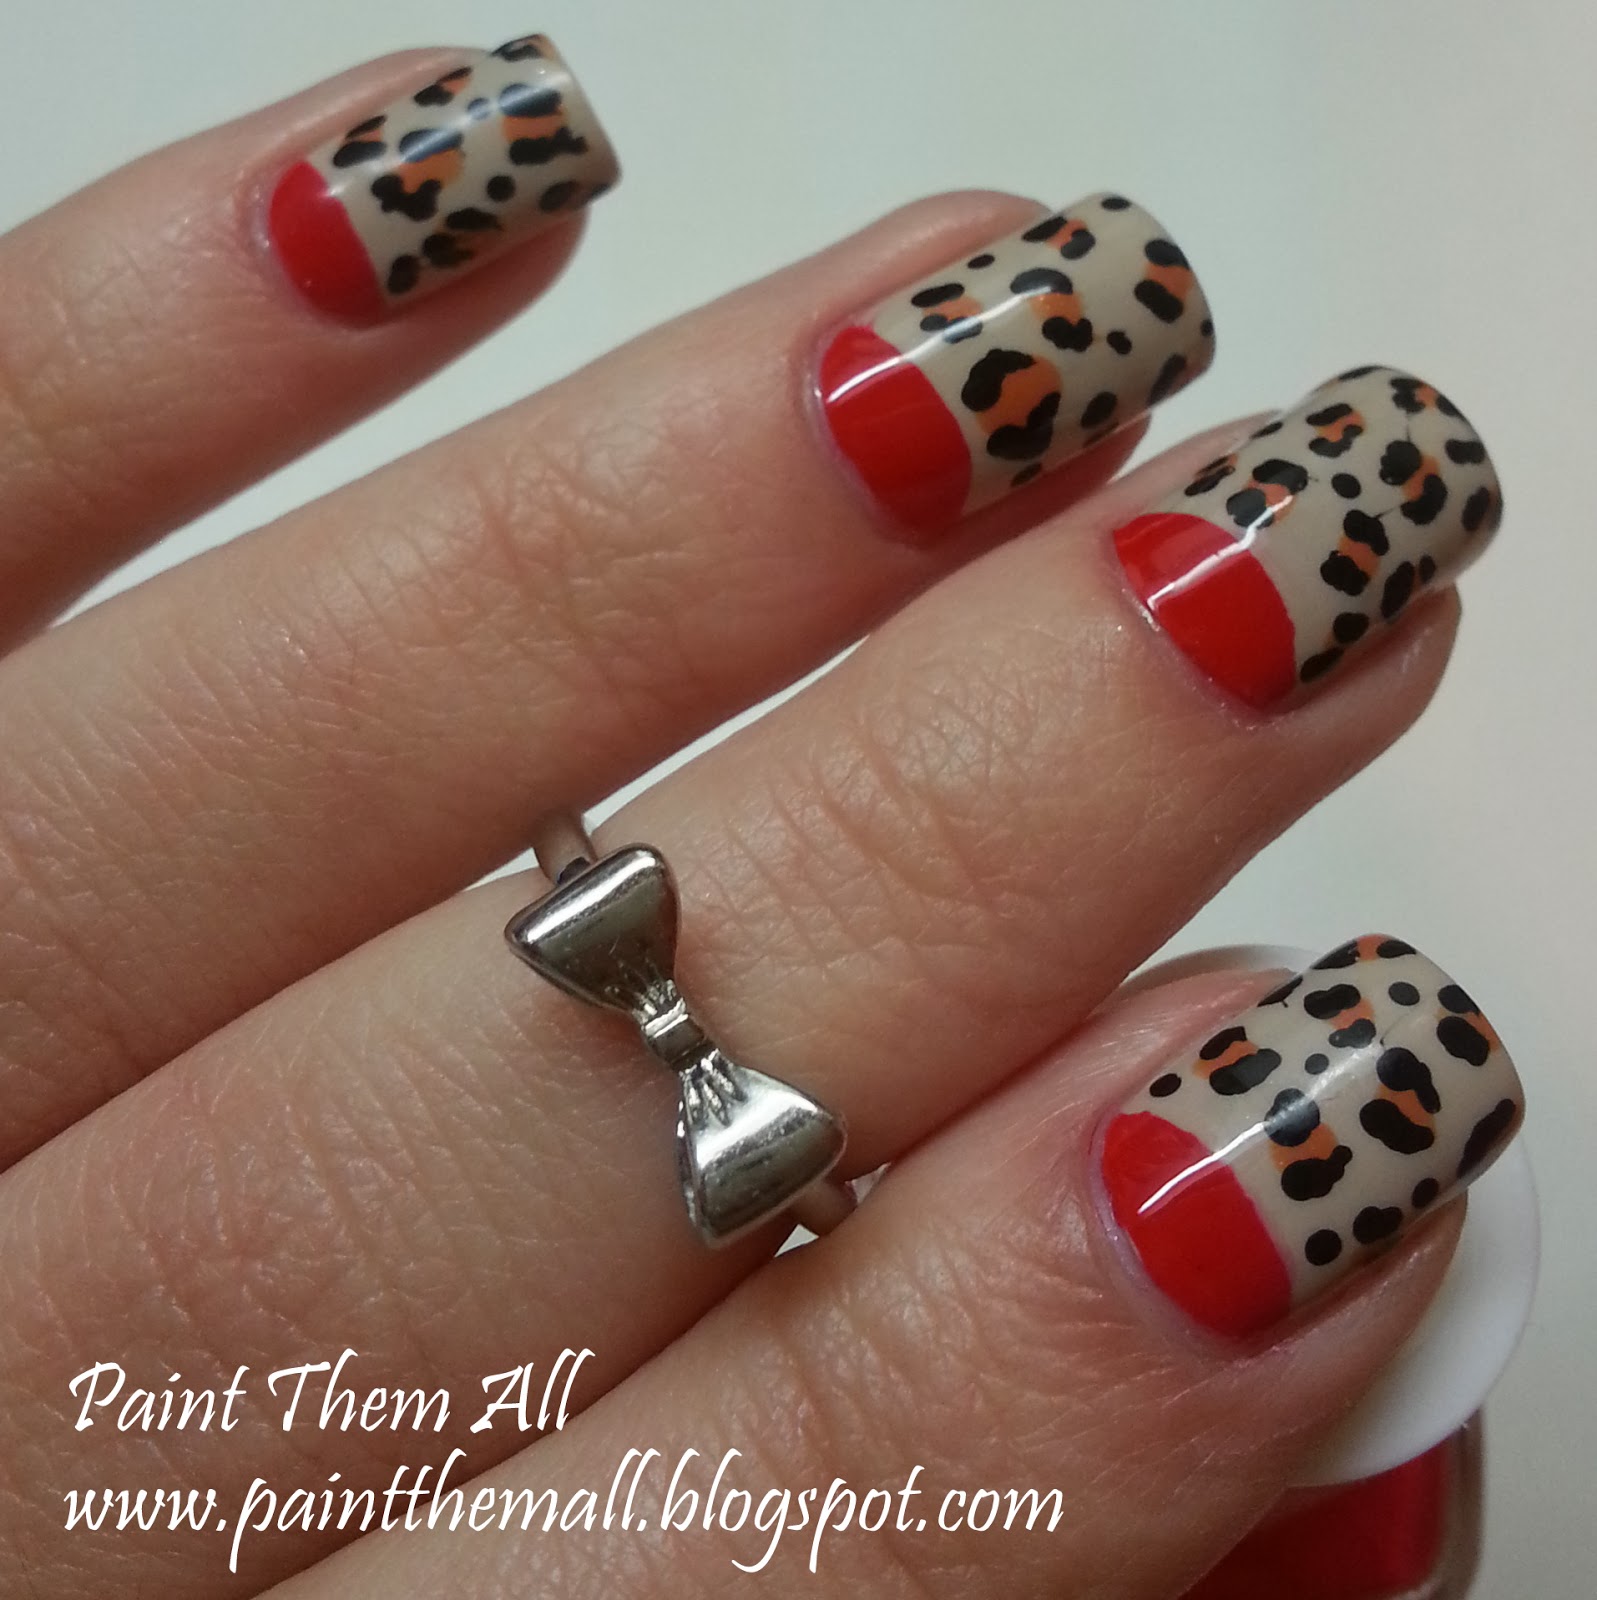
The Lacquer Legion - Adoration: Half Moon Leopard Nails


The theme for this month's Lacquer Legion challenge was adoration, so I decided to recreate a manicure that I've adored for a really long time. I actually can't remember when I first saw it or how did I stumble upon it, but I've wanted to recreate it for a log time and this is a perfect opportunity. I have no idea who originally created this, but I think I first saw it on Nail Polish Wars, and she was inspired by The Daily Nail (the first nail blogger I ever followed) so I think it's pretty appropriate for the whole adoration thing :)

It's not the first time I've done leopard nails, it's actually one of my favorite nail looks, and it's so fun and easy to do. The half moons part was trickier... I never seem to get them all to look the same. This time I tried a slightly different technique and it worked awesome, so I think I'm gonna try this again sometimes soon.

I Started with 2 coats of Essie - Sand Tropez and waited for about 30 minutes until it was completely dry. Then, I used French Manicure stickers that I got from a local beauty supply store to add the half moons using Essie - Too Too Hot and a thin nailart brush.
Then, I added some random blobs using Ga-de - Amber Blaze and outlined them with WOW 393.

הנושא לעיצוב החודשי של "ליגת הלקים" היה הערצה, אז החלטתי לשחזור מניקור שאני מאוד אוהבת. ראיתי את העיצוב הזה לפני המון זמן ואני לא זוכרת איפה ומתי נתקלתי בו לראשונה, אבל כבר המון זמן שמתחשק לי לנסות אותו בעצמי. אני חושבת שראיתי אותו בפעם הראשונה בבלוג Nail Polish Wars, שקיבלה את ההשראה מהבלוג The Daily Nail (בלוג הציפורניים הראשון שאי פעם עקבתי אחריו!) אז אני חושבת שזה די מתאים לכל עניין ההערצה :)

זו לא הפעם הראשונה שאני עושה ציפורניים מנומרות, זה אחד העיצובים האהובים עליי, וכל כך כיף וקל ליצור אותו. הקטע הבעיית יותר עבורי היה חצאי הירח... ניסיתי כמה פעמים, אבל אני אף פעם לא מצליחה לגרום להם לצאת אחידים ויפים. הפעם ניסיתי בשיטה קצת אחרת וזה עבד מעולה, אז נראה לי שאני הולכת להשתמש בטכניקה הזו שוב בזמן הקרוב...

התחלתי עם שתי שכבות של Essie - Sand Tropez וחיכיתי בערך 30 דקות לייבוש מלא. לאחר מכן השתמשתי במדבקות פרנץ' מניקור שקניתי ברשת סקארה כדי להוסיף את חצאי הירח בעזרת Essie - Too Too Hot ומברשת דקה.
לבסוף הוספתי חברבורות אקראיות בעזרת Ga-de Amber Blaze ותחמתי אותן בעזרת הלק השחור האהוב עליי, WOW 393.


Wednesday, February 5, 2014

Inspired by The Winter Olympics (Featured in GOstyle Magazine)


לפני מס' שבועות קיבלתי פנייה מרגשת ומשמחת - להשתתף בכתבה בעיתון גו סטייל שעוסקת בעיצובי ציפורניים בהשראת אולימפיאדת סוצ'י. הכתבה פורסמה היום ויחד איתי מופיעות גם גולדי המוכשרת ודנרה המקסימה. אני מזמינה אתכן לקרוא איך יצרתי את המראה ומה הייתה ההשראה שלי... כל המידע מופיע ממש כאן!

A few weeks ago I received a really exciting request from GOstyle magazine - they approached me about creating a nailart look inspired by The Winter Olympics in Sochi. The article came out today and in this post I'll show you which products I used and what was my inspiration. I'm featured with 2 great Israeli bloggers: the lovely Danra and the talented Goldi
Read the full post right after the jump!

Monday, December 23, 2013

Winter Skittle Manicure

I started this manicure with 2 coats of Essie Sand Tropez on my thumb, pointer & pinkie. On my middle and ring fingers I applied 2 coats of WOW 437. Then I used the sweater stamp from Bundle Monster 423, with Essie Skirting The Issue. It's a small stamp, but I wanted to create a messy sweater look so I stamped it several times on every nail.


התחלתי את העיצוב הזה עם 2 שכבות של Essie Sand Tropez על האגודל, האצבע והזרת. על האמה והקמיצה מרחתי 2 שכבות של וואו מס' 437. לאחר מכן השתמשתי בחותמת הסוודר מBundle Monster 423, עם Essie Skirting The Issue. זו חותמת קטנה, אבל רציתי ליצור דוגמת סוודר מבולגנת, אז החתמתי את אותה תמונה כמה פעמים על כל ציפורן.


After I was done I felt like adding something, so I used a sponge to create a glitter gradient with GlitterBunny Rainbow Sprinkles on my thumb and pinkie. 
Finally I stamped this cute holly image from Bundle Monster 302 with Ga-de Emerald and Essie Too Too Hot. I used a dotting tool to fill it in, painted the white stripes with a white striper polish. and added some polka dots with China Glaze Passion.


אחרי שסיימתי הרגשתי שחסר לי עוד משהו, אז השתמשתי בספוג כדי ליצור גרדיאנט בעזרת הגליטר Rainbow Sprinkles של GlitterBunny על האגודל והזרת. 
לסיום, החתמתי את הצמח הכריסמסי הזה מBundle Monster 302 עם Ga-de Emerald ועם Essie Too Too Hot. השתמשתי במנקד ובאותם הלקים כדי למלא את הדוגמא החלולה, הוספתי קצת פרטים בעזרת לק מנקד לבן, וסיימתי עם נקודות זהובות בעזרת China Glaze Passion.


Tuesday, October 8, 2013

Nautical Nails With Bundle Monster 407


Those of you who follow me on instagram have probably seen that I got some nailmail from Bundle Monster today. The shipping was super quick! I placed my order on the 26th and it was waiting for me yesterday. I was so excited and happy to receive it, and I couldn't wait to try it out already. 

אלה מכם שעוקבים אחריי באינסטגרם בטח ראו שקיבלתי משלוח מבאנדל מאנסטר היום. המשלוח מהוואי הגיע ממש מהר! הזמנתי ב26.9 והפתק מהדואר חיכה לי כבר אתמול. כל כך התרגשתי ושמחתי לקבל את החבילה, ולא יכולתי לחכות עד שאנסה את הדסקיות. 


I knew I was going to try plate 407 first, because it's my favorite one. I've used 1 coat of Seche Wonderfully Witty as the base color for most of my nails, then I stamped the anchor using China Glaze Passion. I also added a thin coat of Orly Prisma Gloss Silver to add some shine. 

The base color on my ring finger is 1 coat of Milani White On The Spot, and the stamping was done using Seche Wonderfully Witty and Essie Too Too Hot. It was really hard to get this stamp right where I wanted it, and I had to redo it over and over until I got a result that was good enough, but it was totally worth it.
I can't wait to use some more images from the collection, and I think it's the best one from Bundle Monster.

ידעתי שאני רוצה להשתמש קודם בדסקית מס' 407, כי היא האהובה עליי. השתמשתי בשכבה אחת של Seche Wonderfully Witty על רוב הציפורניים שלי, והחתמתי את העוגן בעזרת China Glaze Passion. אחר כך הוספתי שכבה דקה של Orly Prisma Gloss Silver כדי להוסיף קצת ברק. 

על הקמיצה מרחתי שכבה אחת של Milani White On The Spot, והחתמתי עם Seche Wonderfully Witty ועם Essie Too Too Hot. היה לי ממש קשה למקם את החותמת בצורה ישרה בדיוק במקום שרציתי, והייתי צריכה נסות שוב ושוב עד שהתוצאה נראתה טובה מספיק, אבל המאמץ היה שווה את זה. אני לא יכולה לחכות עד שאשתמש בשאר הדסקיות שקורצות לי מהאוסף הזה!


מי שלא מכירה את המותג, מדובר בחברה שממוקמת בהוואי ומייצרת בין השאר דסקיות להחתמה. הדסקיות מגיעות באוספים (21-26 דסקיות בכל אוסף). זה האוסף החמישי שלהם, ובשונה מהקולקציות הקודמות, הפעם כל העיצובים נוצרו ע"י הגולשות ששלחו רעיונות. אני חושבת שזה האוסף הכי טוב שלהם - גם כי הפעם העיצובים נוצרו ע"י הגולשות שידעו בדיוק מה חסר להן, וגם כי המחיר הפעם הרבה יותר זול מהאוספים הקודמים.
בדרך כלל הם מוכרים אוסף של 25 דסקיות ב22$, הפעם הם מוכרים אוסף של 26 דסקיות ב16.5$
יש דמי משלוח של 8.5$, אז כדאי לקחת את זה בחשבון לפני ההזמנה, ואולי להזמין יותר מסט אחד (או לקנות משהו אחר מהמגוון האדיר שיש להם באתר).
גם אם מזמינים רק סט אחד - המחיר פר דסקית יוצא ממש ממש משתלם (כמובן שזה משתלם רק בתנאי שאהבתם את רוב הדסקיות, אבל הסט הזה כל כך יפה ואין לי בכלל ספק שכולם יצליחו להתחבר אליו ולמצוא שם משהו שיתאים להם).

לא לשכוח להזין אחד משני הקודים האלה כדי לקבל 10% הנחה: thanks, UDABEST (אני לא חושבת שאפשר להזין שני קודים ולקבל הנחה כפולה, אבל אם מישהי מנסה ומצליחה אשמח לקבל על כך עדכון)


Monday, September 23, 2013

31DC2013 - Day 22: Inspired By A Song (Morena Mía)


The challenge for the 22nd day of the 31DC2013 was creating a manicure inspired by a song. I was inspired by the song Morena Mía by Miguel Bosé and Julieta Venegas. Julieta is one of my favorite singers (perhaps my favorite one) and I really  love this song, but I'm not so sure I love the manicure.

The song talks about a man's love to a "morena" girl (brown/tanned) so I've combined different shades of brown and taupe and added some stamps from Bundle monster 311 and 303.

You can read the lyrics translated to english in this link if you want to know what the song is about, because I find it a bit hard to explain it myself :)

I've used a lot of shades for this manicure and I don't remember all of their names, but as always I took a picture of what I've used, and if you have any questions about a specific shade feel free to ask me in the comment section or send me an e-mail (link is on the top right part of the screen).

Thanks for reading and I'll see you all very soon with my manicure inspired by a movie.


Saturday, September 14, 2013

31DC2013 - Day 14: Flowers


 Today I went with a design that I usually paint over a french manicure, but today I felt like wearing it on it's own.

I started with 2 coats of Careline #366 (a very sheer pink with a jelly finish) and then dotted the flowers using 5 colors: Chic Black Fog #32 (black), Ga-de Lemon Lime #426 (yellow), WOW #303 (green), Essie Too Too Hot (red) and China Glaze Something Sweet (pink).

After I finished with the flowers I went back with 2 more cots of the sheer pink, and then applied my fast drying topcoat (Poshe).


Sunday, September 1, 2013

31 Day Challenge - Day 1: Red


Yay! Day one is probably the most exciting one, there is a lot of motivation and tons of ideas running through my brain right now :)

This design sort of reminds me of a watermelon. To create it, I chose my favorite red nail polish: Essie Too Too Hot. it's not too orange, not too dark, and with the slightest hint of coral I really love how this looks on my skin tone

The formula on this one is absolutely perfect! Full coverage in one thick coat or two thin ones (which is what I did here), it dries insanely quick, with an amazing glossy finish.

I added these cute black studs that got from lightinthebox a while ago and topcoated it, and that's it.
Super easy and elegant.

Hope you liked it :)


איזה כיף! היום הראשון של האתגר הוא כנראה המרגש ביותר, הראש שלי מוצף ברעיונות להמשך ויש המון מוטיבציה להתמיד :) מקווה שזה ימשיך כך גם בהמשך

העיצבו הזה קצת מזכיר לי אבטיח. כדי ליצור אותו, התחלתי עם הלק האדום האהוב עליי - Essie Too Too Hot. הוא לא כתום מדי, לא כהה מדי, ויש לו טיפהל'ה קורליות. אני ממש אוהבת את הצבע הזה בשילוב עם גוון העור שלי.

מבחינת הפורמולה הוא פשוט מושלם! כיסוי מלא בשכבה עבה, או שתיים דקות (שזה מה שאני עשיתי כאן), הוא מתייבש מהר בטירוף, עם גימור גלוסי משגע.

אחרי שהוא התייבש הוספתי את הstuds החמודים האלה שקניתי פעם בlightinthebox וקינחתי בטופקואוט. זה הכל, פשוט ואלגנטי.

מקווה שאהבתן :)


Sunday, August 11, 2013

Some Recent Manicures


2 coats of Milani White On The Spot, Stamped with Bundle Monster 315 and China Glaze Awaken.


1 coat of China Glaze Passion and 1 coat of Essie Too Too Hot.


2 coats of Pupa Milano holographic #031, Light Green from this post, the glitter gradient is with Ciate London Baby, and the accent finger is 2 coats of Ciate Locket.


3 coats of butter LONDON Lady Muck, dotted with Ga-de Emerald, Ga-de Lemon Lime, and Revlon Surf + matte topcoat. 2 Accent nails with 2 coats of L.A Girl Sands of Time.


2 coats of butter LONDON Trout Pout. This color is really hard to photograph and my pictures aren't very accurate. The first 2 pictures are indoors and the next 2 pictures are outside, in the sun. Vampy Varnish has a really good swatch of this color


After wearing this gorgeous color for 1 day I decided to add a stamp from Bundle Monster 316 using China Glaze Passion.


Friday, June 28, 2013

Video Tutorial! Splatter Manicure Using a DIY Decal


Hi guys!
So I already told you how much I love Sophie's awesome blog and now she's having an amazing competition, And get this: the topic she chose is splatter manicure!

I got so many comments and questions about this design that I posted a few days ago, so I thought to myself: what a great opportunity to film a video tutorial and show you guys how I make this kind of manicure using the DIY decal technique that I learned over at Spector's Nails.

This time I learned from my previous mistakes and chose a lighter base color. I also cut the decals into smaller pieces, and I think the finale result looks much better.


These are polishes I've used:
  • WOW #363 (local dupe to OPI's My Vampire Is Buff)
  • e.l.f Flirty Fuscia (pink) [I know that's not the right way to spell it, but that's what it says on the bottle... someone forgot the 'h']
  • e.l.f Coral Dream (coral)
  • Essie Too Too Hot (red)
  • Nubar Spark (brown-ish/taupe-ish golden holo)

I also did one finger with the leftovers from my previous manicure. And I still have some left for future designs!

BTW - the design that apears at the end of the video is something I made a few days ago, but I had no time to post about it. I used the same leftover decals, but this time I only aplyed them to the tips, and not all over the nail.
My base color is Nubar Spark, most nails are 3 coats, some nails only needed 2 :)

היי!
כבר סיפרתי לכן עד כמה אני אוהבת את הבלוג המדהים של סופי מנורבגיה, ועכשיו היא עורכת תחרות מדליקה שהנושא שלה הוא מניקור בשיטת ההתזה!

קיבלתי הרבה תגובות ושאלות על העיצוב שהעליתי לפני כמה ימים, אז חשבתי לעצמי שזו הזדמנות טובה לחזור על העיצוב הזה לפי השיטה שלמדתי בבלוג המקסים הזה משוויץ (ממש קיבוץ גלויות :-P), אבל הפעם להכין סרטון הסבר. ההסברים בסרטון הם באנגלית, אבל אני מאמינה שרובכן תסתדרו עם זה. גם רואים מה אני עושה וגם אפשר לקרוא את הפירוט שלי  בפוסט הקודם. אם בכל זאת משהו לא מובן אתן מוזמנות לכתוב לי ואשתדל להסביר :)

הפעם למדתי מהטעויות של העיצוב הקודם והלכתי על צבע בהיר יותר וחתיכות קטנות יותר של מדבקה, מה שמאוד הקל עליי את הניקיון בסוף. 

הנה הצבעים שהשתמשתי בהם:
  • WOW #363 (הדיופ המקומי והזול לMy Vampire Is Buff של OPI)
  • e.l.f Flirty Fuscia (ורוד)
  • e.l.f Coral Dream (קורלי)
  • Essie Too Too Hot (אדום)
  • Nubar Spark (צבע שקצת קשה להגדיר. חום-טאופי-זהוב הולגרפי מהמם)
על אצבע אחת השתמשתי בשאריות מהמדבקה שהכנתי בפוסט הקודם, ועדיין נשארו לי שאריות משני הצבעים שאוכל להשתמש בהן לעיצוב אחר!

דרך אגב - את העיצוב שמופיע בסוף הסרטון עשיתי לפני כמה ימים אבל לא הספקתי לפרסם פה. השתמשתי באותן שאריות מהמדבקה השחורה, אבל הפעם אל הדבקתי על כל הציפורן אלא רק על הקצה העליון. הצבע המהם שבבסיס הוא Nubar Spark. על רוב האצבעות מרחתי 3 שכבות, ועל חלקן רק 2 :)


linkwithin

Related Posts Plugin for WordPress, Blogger...