Showing posts with label nailart. Show all posts

Wednesday, May 13, 2015

OPI This Color's Making Waves - Swatches and Comparison (Dupe Alert)

נתחיל בסיפור קצר:
מכירות את זה שאתן קונות לק או בגד כלשהו, וברגע שאתן מגיעות הבייתה ומנסות אותו, פתאום אתן מגלות שהוא ממש, אבל ממש, לא לטעמכן?

אז לפני כמה ימים עשיתי סדר במגירות הלקים, ומצאתי לק שהתחבא אי שם מאחור, כי זנחתי אותו שם מיד אחרי הקנייה הלא מוצלחת... ואיכשהו פתאום אחרי בערך שנה מאז שקניתי אותו, התחשק לי עליו... אז מרחתי אותו, ויומיים אחר כך הגעתי לסניף הדואר המקומי. שם חיכתה לי חבילה שנשלחה אליי מOPI, עם לק מקולקציית הוואי שעולה בימים אלה למדפים בארץ.

כשפתחתי את המעטפה, גיליתי שהלק שהיה בתוכה הוא דיופ מדוייק ללק ההוא, שנזנח אצלי במגירה לפני שנה!
סקרניות לראות את שני הלקים התאומים? פשוט תמשיכו לקרוא...

Wednesday, October 9, 2013

Simple Stamping with Bundle Monster 404


Yesterday I showed you my new stamping plates from Bundle Monster, and today I have a new design (after the previous one somehow peeled off). I chose to use plate 404, and created this simple look. I used 1 coat of Milani Black Swift as the base color on 3 fingers, and 1 coat of Kiko 619 Red Peony on the remaining 2. I stamped two images from the plate using Kiko 619 & WOW 363. 

I have a video tutorial coming up for this look, but it's in Hebrew this time...


אתמול הראיתי כאן את הדסקיות החדשות שלי, והיום השתמשתי בהן כדי ליצור עיצוב חדש (אחרי שהקודם פשוט התקלף לי מהציפורניים). בחרתי להשתמש בדסקית מספר 404 לעיצוב הנוכחי. התחלתי עם שכבה אחת של Milani Black Swift על 3 ציפורניים, ושכבה אחת של Kiko 619 Red Peony על השתיים הנותרות.
את ההחתמה עשיתי עם אותו לק של קיקו, ועם לק מס' 363 של וואו.

הכנתי גם מדריך וידאו למראה הזה ואני מקווה להעלות אותו לכאן בקרוב. יש למה לצפות :)


Sunday, July 14, 2013

Feather Nail Art + Tutorial!


Today I had a little time off and I decided to use that time for some nail art. It's been a long time since I did something like this. I've been really busy with school work, so the most "complicated" nail art I did was stamping. I really missed it, it's just so much fun!

I've never tried this look before so I looked for some online tutorials, but as I was going along I realised I'm sort of changing the tutorial and making it more suitable for me, so I decided I'll share it with you guys! 

These are the products that I used to create this look:
  • Milani White On The Spot
  • Top Beauty black & white stripers
  • LAKA silver (#161)
  • GK #734A - holographic glitter topper
  • thin nail art brush
I started off with 2 coats of Milani White On The Spot
Then I drew a thin arched line across the nail using a black striper (1). 
After that I drew very thin lines on both sides of the arch with the same striper, making sure I have very little polish on the brush (2).
I wanted to refine the lines so I took a white striper and drew a super thin line over the original first line, and I also added some random thin white lines on the sides of the feather (3).
I then drew a thin silver line over the White line (4) and added a little bit holographic glitter over the silver line - to add an extra spark.
Finally - I added a layer of Poshe fast drying top coat.

You don't have to follow all of the steps I did. A you can see in the photos - it looks good enough even after the first step. But if you do have some extra time, I really think the final result it worth the effort. This is one of the prettiest designs I'd ever done :)

***תרגום לעברית אחרי התמונות***


final look


 היום היה לי קצת זמן חופשי והחלטתי לחזור לעשות ניילארט. אחרי שלא היה לי זמן לזה במשך כל התקופה האחרונה. בגלל כל העומס של הלימודים, הדבר הכי "מסובך" שעשיתי לאחרונה היה חותמות, שזה סבבה והכל - אבל כבר התחיל טיפה לשעמם אותי.

אף פעם לא ניסיתי לצייר נוצה על הציפורן, אז חיפשתי מדריכים באינטרנט. תוך כדי העבודה שמתי לב שאני משנה מלא  דברים במדריך המקורי, אז החלטתי להראות לכם מה עשיתי.

אלה החומרים שהשתמשתי בהם:
  • לק לבן של מילאני
  • סטרייפרים של טופ ביוטי בצבעים שחור ולבן
  • לק כסוף של LAKA, מס' 161
  • גליטר הולוגרפי של GK, מס' 734A
  • מברשת דקה
התחלתי עם 2 שכבות של לק לבן (Milani White On The Spot)
השתמשתי בסטרייפר השחור וציירתי קשת אלכסונית באמצע הציפורן  (1).
עם אותו לק, ציירתי פסים דקים מאוד משני הצדדים של הקשת. וידאתי שיהיה ממש מעט לק על המברשת כדי שזה ייצא הכי דק שאפשר (2).
רציתי לרכך קצת את המראה אז בעזרת הסטרייפר הלבן הוספתי פס דק מאוד איפה שהייתה הקשת המקורית, והוספתי גם כמה פסים לבנים אקראיים בשאר החלקים של הנוצה (3).
עם מברשת דקה, ציירתי פס כסוף מעל הפס הלבן (4) והוספתי קצת גליטר הולוגרפי מעל הפס הכסוף.
סיימתי בשכבה של מייבש פושה. 

אתן ממש לא חייבות לעשות את כל השלבים שאני עשיתי כי זה לוקח המון זמן, ואפשר לראות בתמונות שכבר אחרי השלב הראשון מתקבלת תוצאה מאוד יפה, אבל אם יש לכן זמן וכוח - התוצאה הסופית ממש שווה את זה. אני חושבת שזה אחד העיצובים הכי יפים שיצא לי לעשות :) 

Friday, June 28, 2013

Video Tutorial! Splatter Manicure Using a DIY Decal


Hi guys!
So I already told you how much I love Sophie's awesome blog and now she's having an amazing competition, And get this: the topic she chose is splatter manicure!

I got so many comments and questions about this design that I posted a few days ago, so I thought to myself: what a great opportunity to film a video tutorial and show you guys how I make this kind of manicure using the DIY decal technique that I learned over at Spector's Nails.

This time I learned from my previous mistakes and chose a lighter base color. I also cut the decals into smaller pieces, and I think the finale result looks much better.


These are polishes I've used:
  • WOW #363 (local dupe to OPI's My Vampire Is Buff)
  • e.l.f Flirty Fuscia (pink) [I know that's not the right way to spell it, but that's what it says on the bottle... someone forgot the 'h']
  • e.l.f Coral Dream (coral)
  • Essie Too Too Hot (red)
  • Nubar Spark (brown-ish/taupe-ish golden holo)

I also did one finger with the leftovers from my previous manicure. And I still have some left for future designs!

BTW - the design that apears at the end of the video is something I made a few days ago, but I had no time to post about it. I used the same leftover decals, but this time I only aplyed them to the tips, and not all over the nail.
My base color is Nubar Spark, most nails are 3 coats, some nails only needed 2 :)

היי!
כבר סיפרתי לכן עד כמה אני אוהבת את הבלוג המדהים של סופי מנורבגיה, ועכשיו היא עורכת תחרות מדליקה שהנושא שלה הוא מניקור בשיטת ההתזה!

קיבלתי הרבה תגובות ושאלות על העיצוב שהעליתי לפני כמה ימים, אז חשבתי לעצמי שזו הזדמנות טובה לחזור על העיצוב הזה לפי השיטה שלמדתי בבלוג המקסים הזה משוויץ (ממש קיבוץ גלויות :-P), אבל הפעם להכין סרטון הסבר. ההסברים בסרטון הם באנגלית, אבל אני מאמינה שרובכן תסתדרו עם זה. גם רואים מה אני עושה וגם אפשר לקרוא את הפירוט שלי  בפוסט הקודם. אם בכל זאת משהו לא מובן אתן מוזמנות לכתוב לי ואשתדל להסביר :)

הפעם למדתי מהטעויות של העיצוב הקודם והלכתי על צבע בהיר יותר וחתיכות קטנות יותר של מדבקה, מה שמאוד הקל עליי את הניקיון בסוף. 

הנה הצבעים שהשתמשתי בהם:
  • WOW #363 (הדיופ המקומי והזול לMy Vampire Is Buff של OPI)
  • e.l.f Flirty Fuscia (ורוד)
  • e.l.f Coral Dream (קורלי)
  • Essie Too Too Hot (אדום)
  • Nubar Spark (צבע שקצת קשה להגדיר. חום-טאופי-זהוב הולגרפי מהמם)
על אצבע אחת השתמשתי בשאריות מהמדבקה שהכנתי בפוסט הקודם, ועדיין נשארו לי שאריות משני הצבעים שאוכל להשתמש בהן לעיצוב אחר!

דרך אגב - את העיצוב שמופיע בסוף הסרטון עשיתי לפני כמה ימים אבל לא הספקתי לפרסם פה. השתמשתי באותן שאריות מהמדבקה השחורה, אבל הפעם אל הדבקתי על כל הציפורן אלא רק על הקצה העליון. הצבע המהם שבבסיס הוא Nubar Spark. על רוב האצבעות מרחתי 3 שכבות, ועל חלקן רק 2 :)


Sunday, June 16, 2013

Another Haul Post + Cute & Easy Nailart

I decided to treat myself a little after I had my first exam today, so I got 6 new nail polishes and a pair of shoes :) new stuff is always a great way to start the week!

החלטתי לפנק את עצמי לקראת תקופת המבחנים שהתחילה היום באופן רשמי, וקניתי שישה לקים חדשים וגם זוג נעליים :) הכי כיף להתחיל את השבוע עם דברים חדשים!


Here's what I got (L-R):
Orly - Fowl Play
Essie - Turquoise & Caicos, No More Film, Too Too Hot
Revlon - Naughty
Ga-de - Pale Shell

הנה הלקים שקניתי, משמאל לימין:
Orly - Fowl Play
Essie - Turquoise & Caicos, No More Film, Too Too Hot
Revlon - Naughty
Ga-de - Pale Shell

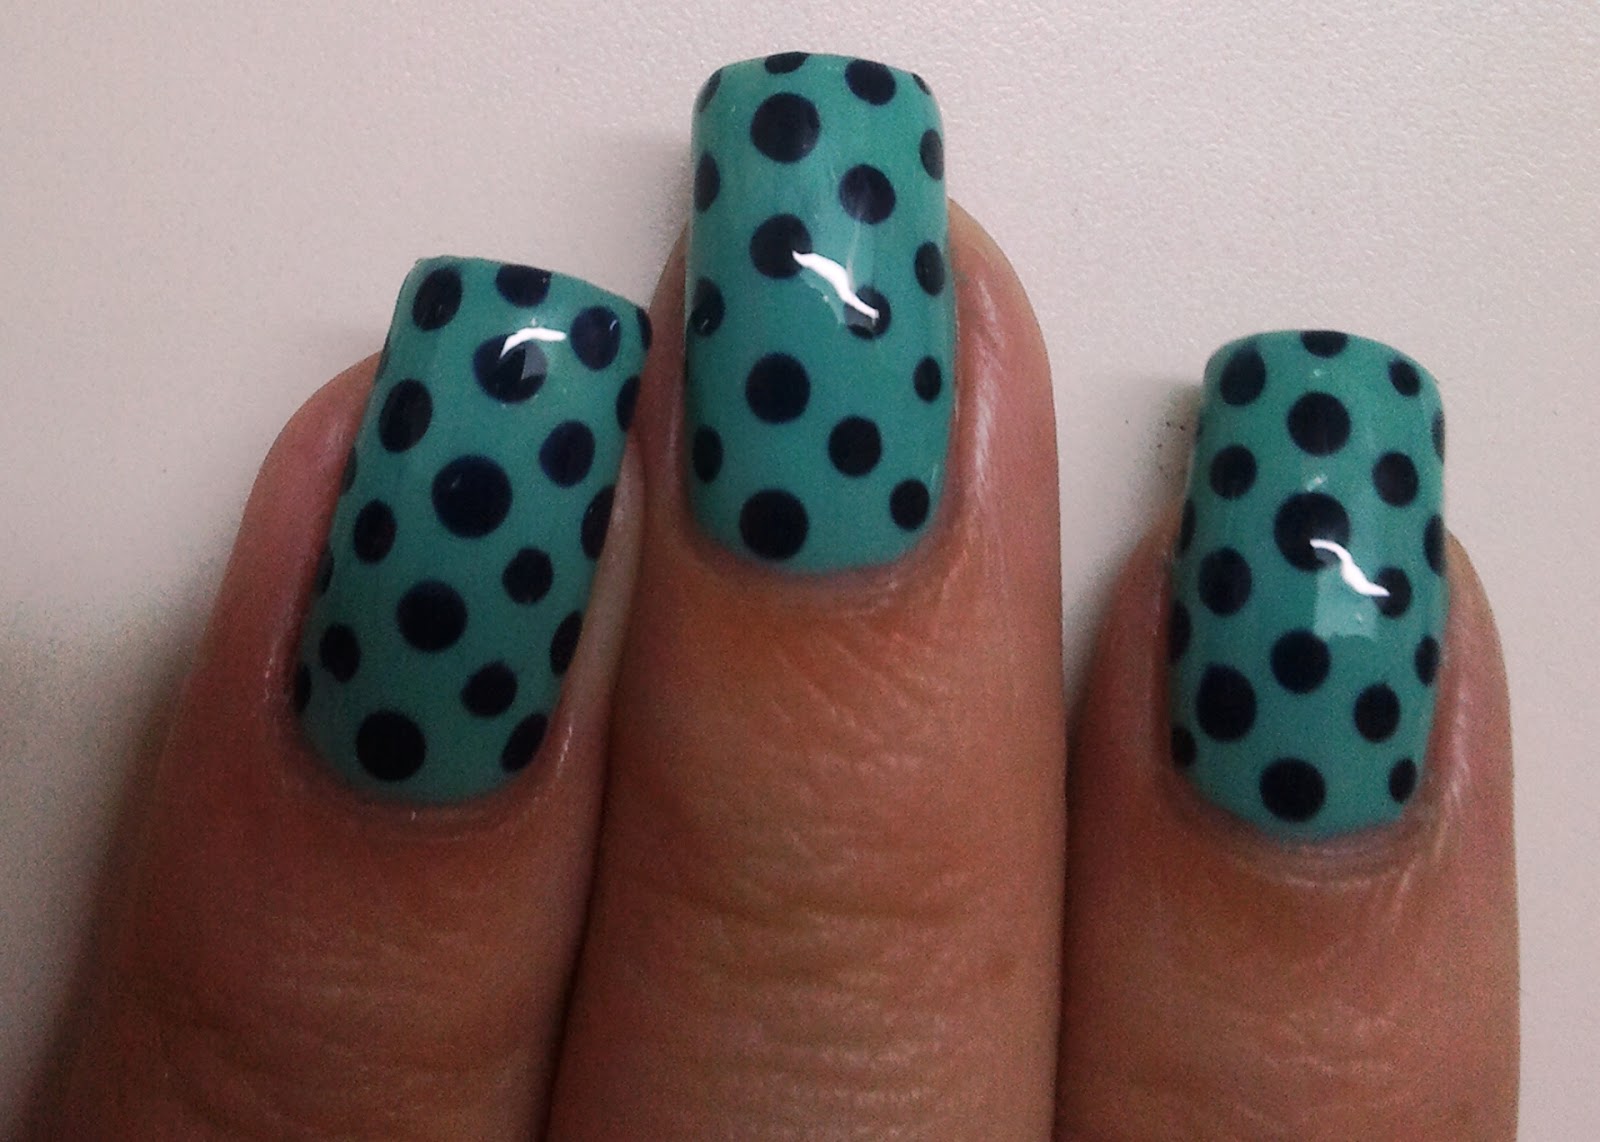
I had a really hard time deciding which of them I'll try first, but I'm a sucker for Essie's cream polishes so I went with a simple dotting combo, using 3 layers of Turquoise & Caicos as my base color, and adding dots with the extremely opaque No More Film.

היה לי ממש קשה להחליט באיזה מהם להשתמש קודם, אבל בגלל שאני מאוהבת בלקים הקרמיים של אסי החלטתי ללכת על שילוב חמוד עם שני גוונים. התחלתי בשלוש שכבות של Turquoise & Caicos ועליהן הוספתי נקודות של No More Film (לק אטום בטירוף!) בעזרת מנקד. 


linkwithin

Related Posts Plugin for WordPress, Blogger...