Showing posts with label splatter. Show all posts

Thursday, March 20, 2014

Stamping with OPI Sheer Tints


אני אפתח בהתנצלות קטנה - המניקור הזה היה עליי בשבוע שעבר וכפי שאתן בטח זוכרות, החורף החליט שבא לו לעשות קאמבק בשבוע הזה. לצערי לא ממש הייתה שמש אז הצבעים בתמונות שלי נראים טיפהל'ה חיוורים. במציאות הם היו יותר בוהקים.

ובחזרה לעניינינו - על סדרת הטופים החדשה Sheer Tints של OPI כבר שמעתן?
מדובר בארבעה לקים שקופים בעלי גוון עדין, שניתן למרוח מעל כל לק על מנת לשנות מעט את הצבע שלו. 
מימין לשמאל:
 I Can Teal You Like Me - טורקיז-כחלחל
 Don't Violet Me Down - סגול קר
 Be Magentale With Me - ורוד-סגלגל
 I'm Never Amberrased  - צהוב-כתמתם


ניתן למרוח את הלקים האלה לבדם, אם כי הם מאוד שקופים וגם אחרי שלוש שכבות הם נשארים שקופים. יש כאלה שדווקא אוהבות את המראה הזה, שיפה במיוחד על ציפורניים קצרות, כפי שניתן לראות בסרטון המצורף.

I'll start with a little apology: the pictures in this post were taken on a very rainy day so the colors are a bit dull...
Today I'll be reviewing the OPI Sheer Tints collection which I'm sure you've all heard of. Just in case you haven't: the collection features 4 sheer top-coats with the slightest tint, they come in blue, purple, pink and yellow.
They can be applied on their own but they'll remain sheer even after 3 coats


למרות שניתן למרוח אותם כפי שהם, המטרה העיקרית של הלקים היא לשמש כשכבת טופ.
המרקם שלהם מאוד סמיך אבל להפתעתי הם התייבשו מהר מאוד. החלטתי לא למרוח טופ מעליהם כדי לבחון את העמידות שלהם כטופ קואוט והופתעתי לטובה! העיצוב השחור היה עליי במשך שבעה ימים ונשמר בצורה מצויינת!

אני הזמנתי את הלקים שלי מאיביי, אבל הם אמורים להגיע בקרוב גם לארץ (לסניפי אפריל ונייל סטודיו). החלטתי לקנות את רביעיית המיני כדי שאוכל להתנסות בכל הצבעים. ניסיתי לשחק איתם בכל מיני דרכים והנה מה שיצא לי:
  • על האצבע המורה מרחתי שתי שכבות של Milani Almond Bliss (צהוב בננה בהיר מאוד) ומעליו מרחתי את ארבעת הטופים, כל אחד על פינה אחרת של הציפורן. הצבעים נראו מצויין בשכבה בודדת, ובנקודות החפיפה ביניהם התקבלו שילובים מעניינים (ורוד+צהוב=כתום, ורוד+כחל=סגול, כחול+צהוב=ירוק).
  • על האמה מרחתי שתי שכבות של לק לבן אטום  (לייף מס' 237) ומעליו מרחתי פסים בעזרת ארבעת הלקים. חוץ מהעיצוב השחור, זו הגירסא שהכי אהבתי. הרגשתי שהעיצוב המפוספס גורם לציפורן להיראות ארוכה ואלגנטית, ומאוד אהבתי את מראה צבעי הקשת שהתקבל.
  • על הקמיצה מרחתי את Ga-de Purity (לק לבן במרקם ג'לי שקפקף) ומעליו ניסיתי ליצור distressed manicure אבל לא כל כך הצלחתי. בפועל זה נראה כאילו סתם ערבבתי את הצבעים על הציפורן. בגלל שלק הבסיס שקוף יחסית, גם הטופים נשארו יחסית שקופים והתקבל מראה עדין יחסית שהזכיר לי צבעי מים.
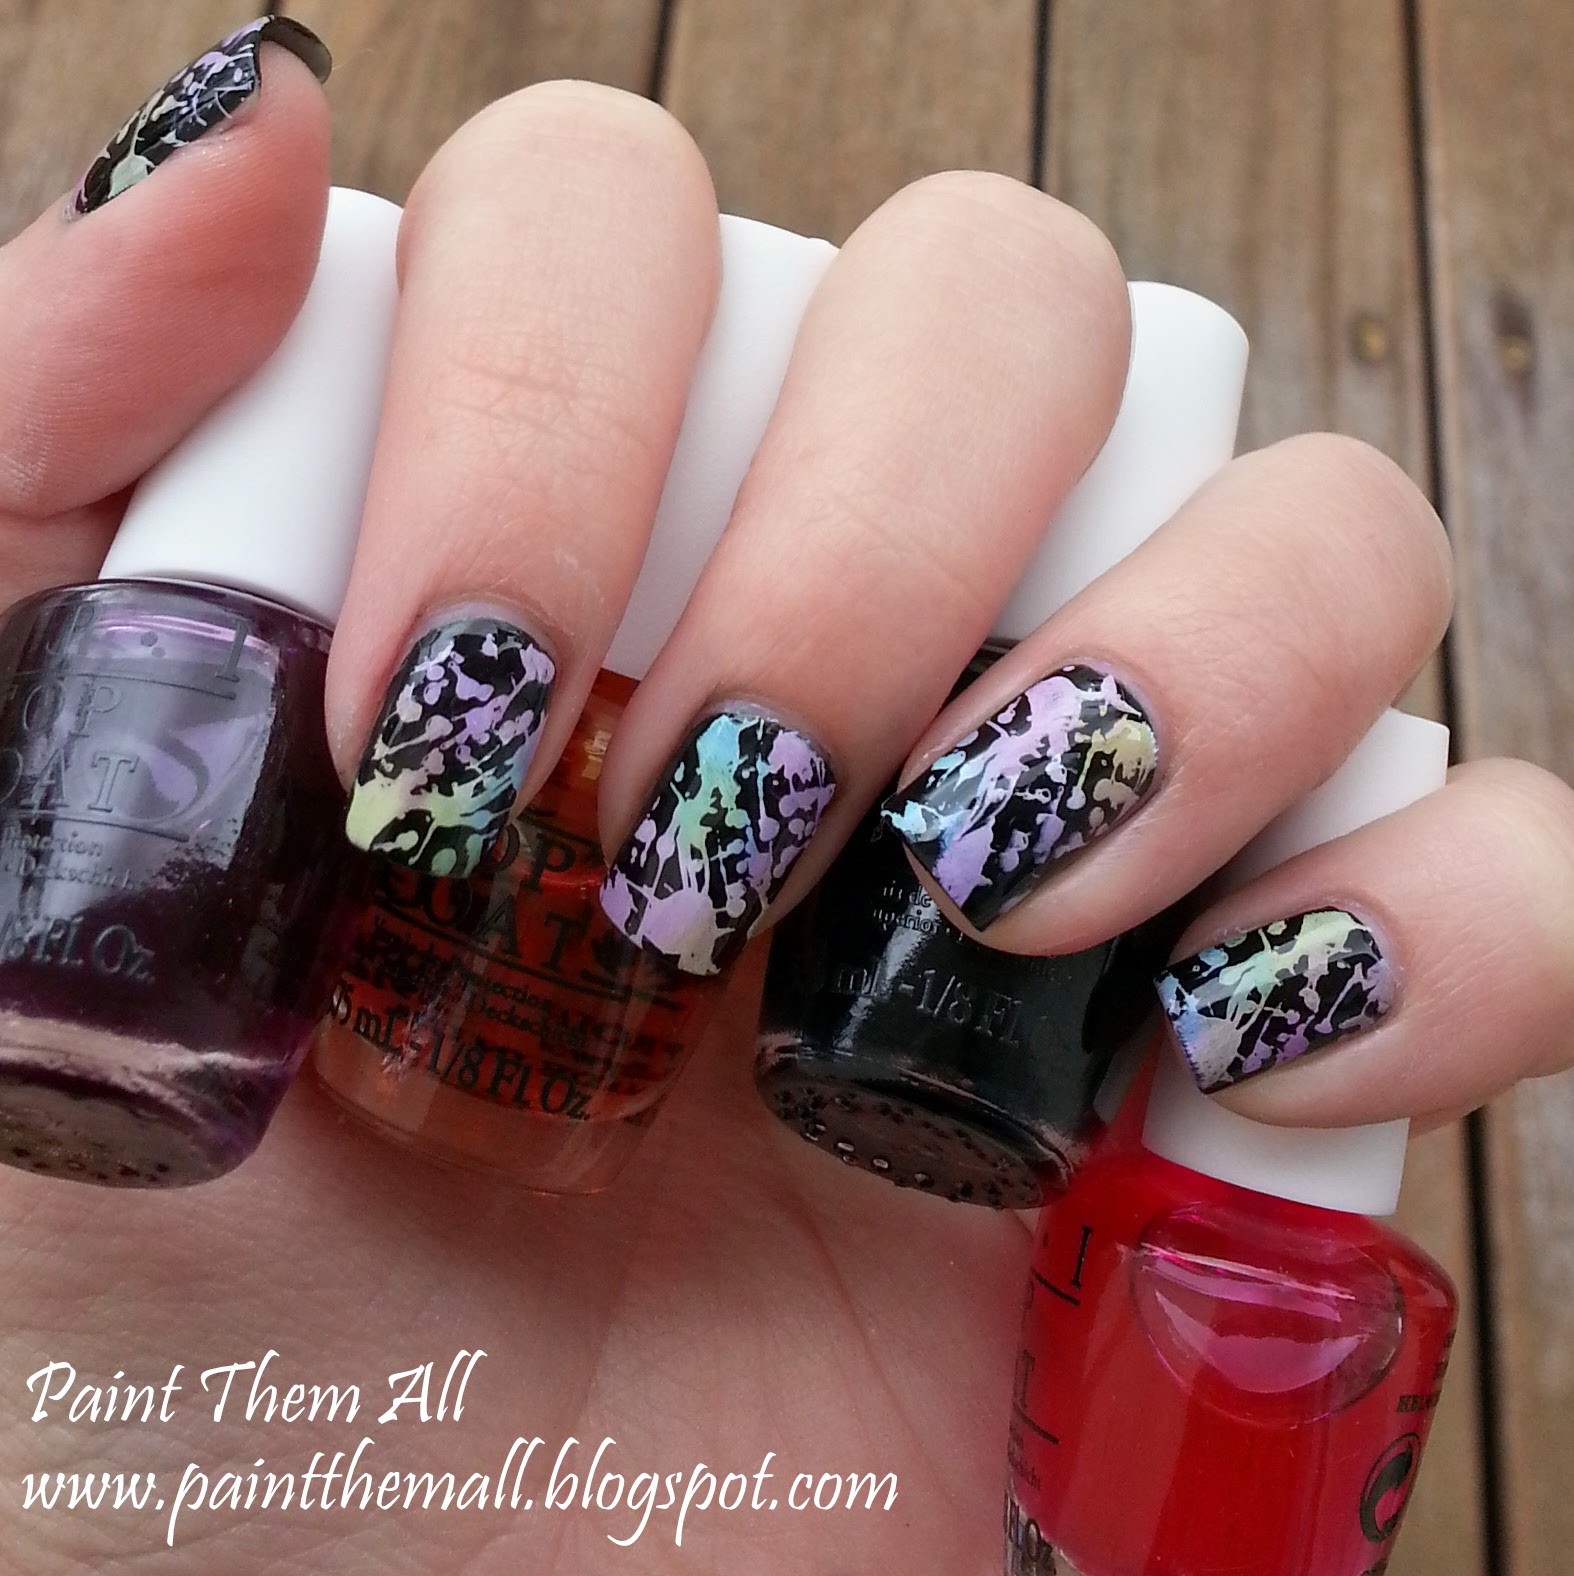
  • על הזרת מרחתי שכבה אחת של לק שחור ( וואו מס' 393), ומעליו החתמתי דוגמה מדסקית 416 של באנדל מאנסטר בעזרת לק לבן (BK Matte White). מעל ההחתמה מרחתי את הטופים הצבעוניים, כל אחד על חלק אחר של הציפורן, ויצרתי גם כמה נקודות חפיפה ביניהם. מאוד קשה (כמעט בלתי אפשרי) להחתים צבעים פסטליים בהירים מעל לק כהה, והטופים השקופים הם הפתרון המושלם למצבים כאלה!

Even though you can wear these on their own, they looked best when layered on top of an opaque base color. I tried different combinations and here's what I came up with:
  • Pointer: 2 coats of Milani Almond Bliss followed by 4 blobs of Sheer Tints. The colors looked great with just 1 coat and I loved how they looked when they overlapped (pink+yellow=orange, pink+blue=purple, blue+yellow=green)
  • Middle: 2 coats of an opaque white (Life #237) and Sheer Tints stripes. This was my favorite design after the black one. I loved the rainbow effect and how my nail lokked long and elegant.
  • Ring: 3 coats of Ga-de Purity (white jelly) and a failed distressed manicure. It ended up looking like random spots of color but I liked the watercolor effect created by the sheerness of the base color.
  • Pinky: 1 coat of black (Wow #393) stamped with a splatter design from Bundle Monster 416 and BK Matte White. I added the Sheer Tints over the whole nail in random spots and made sure they overlapped in certain places. It's nearly impossible to stamp light pastel colors over a dark base so the Sheer Tints are absolutely perfect for this!


אהבתי מאוד את השילוב עם הצבע השחור ולכן הוספתי לעיצובים הבהירים יותר גם שכבה אחת של El Corazon Dalmatian  - טופ גליטרי מיוחד במינו עם חליקיקים שחורים קטנטנים.

I liked how the colors looked with the black nail polish so I decided to add some black to the other nails using El Corazon Dalmatian.


אפשר לעשות עוד כל כך הרבה דברים עם הלקים האלה, אבל בסופו של דבר החלטתי שהכי אהבתי את ההחתמה, ויצרתי את העיצוב על שאר הציפורניים שלי.

There is so much more you can do with these colors but I decided I liked the stamping best so I kept it on for a whole week.


הנה עוד כמה רעיונות יפים לשימוש בטופים המיוחדים האלה:

This post is part of a group project. Myself and some fellow Israeli bloggers decided to create posts inspired by this Jackson Pollock painting.

Friday, June 28, 2013

Video Tutorial! Splatter Manicure Using a DIY Decal


Hi guys!
So I already told you how much I love Sophie's awesome blog and now she's having an amazing competition, And get this: the topic she chose is splatter manicure!

I got so many comments and questions about this design that I posted a few days ago, so I thought to myself: what a great opportunity to film a video tutorial and show you guys how I make this kind of manicure using the DIY decal technique that I learned over at Spector's Nails.

This time I learned from my previous mistakes and chose a lighter base color. I also cut the decals into smaller pieces, and I think the finale result looks much better.


These are polishes I've used:
  • WOW #363 (local dupe to OPI's My Vampire Is Buff)
  • e.l.f Flirty Fuscia (pink) [I know that's not the right way to spell it, but that's what it says on the bottle... someone forgot the 'h']
  • e.l.f Coral Dream (coral)
  • Essie Too Too Hot (red)
  • Nubar Spark (brown-ish/taupe-ish golden holo)

I also did one finger with the leftovers from my previous manicure. And I still have some left for future designs!

BTW - the design that apears at the end of the video is something I made a few days ago, but I had no time to post about it. I used the same leftover decals, but this time I only aplyed them to the tips, and not all over the nail.
My base color is Nubar Spark, most nails are 3 coats, some nails only needed 2 :)

היי!
כבר סיפרתי לכן עד כמה אני אוהבת את הבלוג המדהים של סופי מנורבגיה, ועכשיו היא עורכת תחרות מדליקה שהנושא שלה הוא מניקור בשיטת ההתזה!

קיבלתי הרבה תגובות ושאלות על העיצוב שהעליתי לפני כמה ימים, אז חשבתי לעצמי שזו הזדמנות טובה לחזור על העיצוב הזה לפי השיטה שלמדתי בבלוג המקסים הזה משוויץ (ממש קיבוץ גלויות :-P), אבל הפעם להכין סרטון הסבר. ההסברים בסרטון הם באנגלית, אבל אני מאמינה שרובכן תסתדרו עם זה. גם רואים מה אני עושה וגם אפשר לקרוא את הפירוט שלי  בפוסט הקודם. אם בכל זאת משהו לא מובן אתן מוזמנות לכתוב לי ואשתדל להסביר :)

הפעם למדתי מהטעויות של העיצוב הקודם והלכתי על צבע בהיר יותר וחתיכות קטנות יותר של מדבקה, מה שמאוד הקל עליי את הניקיון בסוף. 

הנה הצבעים שהשתמשתי בהם:
  • WOW #363 (הדיופ המקומי והזול לMy Vampire Is Buff של OPI)
  • e.l.f Flirty Fuscia (ורוד)
  • e.l.f Coral Dream (קורלי)
  • Essie Too Too Hot (אדום)
  • Nubar Spark (צבע שקצת קשה להגדיר. חום-טאופי-זהוב הולגרפי מהמם)
על אצבע אחת השתמשתי בשאריות מהמדבקה שהכנתי בפוסט הקודם, ועדיין נשארו לי שאריות משני הצבעים שאוכל להשתמש בהן לעיצוב אחר!

דרך אגב - את העיצוב שמופיע בסוף הסרטון עשיתי לפני כמה ימים אבל לא הספקתי לפרסם פה. השתמשתי באותן שאריות מהמדבקה השחורה, אבל הפעם אל הדבקתי על כל הציפורן אלא רק על הקצה העליון. הצבע המהם שבבסיס הוא Nubar Spark. על רוב האצבעות מרחתי 3 שכבות, ועל חלקן רק 2 :)


Sunday, June 23, 2013

Splatter Manicure with DIY Decals


I've been wanting to try the splatter technique for quite some time but I was nervous about the clean-up process, so I decided I'd try to do it in a simpler way that will also allow me to choose the exact pattern for each nail

I first saw this method over at this great blog and I thought I'd give it a try.
My nails don't look half as nice as hers, and the clean-up process was a pain in the ass, probably because I chose a dark base color. Next time I'll try a lighter color combination.

I basically followed all of the steps in the tutorial: I made the decal and let it dry over night. It was super easy to peel it off the nylon bag and cut it into small pieces.
The tricky part came after that: I applied 1 coat of my black base color (Chic Black Fog, same color I used for making the decal)
Then I waited a little bit for the polish to dry (not completely) and stuck the decal on each finger. 
I then pulled on the excess and started cleaning around the nail with a q-tip dipped in acetone, and around my cuticles with a thin brush.
THAT WAS THE HARD PART! My fingers were filled with black polish that took forever to get rid of!

I should have probably waited for the polish underneath the decals to completely dry before I started cutting off the excess, and also - I should have cut the decal into smaller pieces so that I wouldn't have so much to clean up...

So if you want to try this technique in the future here are my tips:
1. Make sure you let the decals completely dry before trying to use them
2. Cut the pieces as small as possible
3. Let the polish underneath the decal dry before you start cleaning up around the nail
4. have a lot of patience! The result is really worth it :)

Here are the colors I used:
Chic Black Fog
Essie Turquoise & Caicos
Laka Silver
Pupa Holographic Pink

This is the decal right after I made it. I used the hearts for a different design. These were a bit more complicated to use because I didn't wait long enough and they weren't completely dry.


ועכשיו בעברית:
רציתי לנסות את שיטת ההתזה כבר הרבה זמן אבל פחדתי מכל הלכלוך הנלווה שאני אאלץ לנקות. החלטתי ללכת על שיטה פשוטה יותר שמונעת חלק מהלכלוך וגם מאפשרת לי לבחור בדיוק את הדוגמא שתופיע על כל ציפורן. 

ראיתי את השיטה הזו לראשונה בבלוג הנפלא הזה והחלטתי לנסות. הציפורניים שלי לא יצאו יפות כמו שלה, והיה לי המווון ליכלוך לנקות למרות הכל. כנראה בגלל שהלכתי על צבע בסיס כהה שהיה מאוד קשה לנקות אותו. בפעם הבאה אני אלך כנראה על צבעים בהירים יותר. 

עשיתי הכל כמו שמפורט במדריך: הכנתי את ה'מדבקה' ונתתי לה להתייבש במשך לילה שלם. היה ממש קל לקלף את הלק מהניילון ולחתוך אותו לחתיכות קטנות.
החלק המסובך היה אחרי זה: מרחתי שכבה אחת של לק שחור (Chic Black Fog, אותו צבע שהשתמשתי בו כדי להכין את המדבקה), נתתי לו להתייבש קצת (אבל לא לגמרי) ולאחר מכן הדבקתי את המדבקות.
משכתי את השאריות מכל ציפורן וניקיתי עם מקלון אןזניים ומברשת דקה טבולים באציטון. זה היה החלק הקשה! האצבעות שלי היו מלאות בצבע שחור שלקח לי המון זמן לנקות.

כנראה שהייתי צריכה לחכות שהלק השחור יתייבש לגמרי לפי שהתחלתי לנקות, וכנראה שגם הייתי צריכה לחתוך את המדבקות לחתיכות ממש קטנות כדי שלא יהיה לי הרבה לנקות.

אם גם אתן רוצות לנסות את העיצוב הזה הנה הטיפים שלי:
1. וודאו שהמדבקות מתייבשות לגמרי לפני השימוש. מומלץ לתת להן להתייבש כמה שעות, עדיף לילה שלם
2. חיתכו את המדבקות לחתיכות הכי קטנות שאפשר - שיתאימו בדיוק לציפורן, כדי להקל על תהליך הניקיון
3. תנו ללק שמתחת למדבקה להתייבש לפני שתתחילו לנקות
4. הרבה סבלנות! התוצאה שווה את זה:)

אלה הצבעים שהשתמשתי בהם:
Chic Black Fog
Essie Turquoise & Caicos
Laka Silver
Pupa Holographic Pink

זו המדבקה מיד אחרי שהכנתי אותה. הלבבות שימשו אותי לעיצוב אחר, והיה לי קצת יותר קשה לעבוד איתם כי לא חיכיתי מספיק זמן שיתייבשו.


That's the other manicure I did. Which do you like better?

זה העיצוב השני שלי. איזה אתן מעדיפות?


linkwithin

Related Posts Plugin for WordPress, Blogger...